With the purpose of simplifying the integration of projects applied to games, I developed a simplified and manipulable 2D game engine, enabling to focus essentially on project goals and avoiding to deal with interfacing matters, which can eventually become a complicated task. At least at initial stages of a project development, this approach is useful to recreate games with the same underlying mechanics, until the stage (if necessary) where integration with the original game environment takes place.
Everything was developed in Java and the projects were created using Eclipse. As A* algorithm can be used not only with this Game environment, I separated both projects in GitHub. If you are using Eclipse as well, don’t forget to add A* project to the Java Build Path.
I would say the ability to manipulate the environment is the main feature which justifies - aside from the fun - the development from scratch of this game engine. From appropriate adaptations, there are plenty of areas to develop and apply complementary projects to gaming scenarios, such as artificial intelligence (applicable to several parts of a game, not only giving intelligent behavior to characters), network communication (multiplaying), external user interfaces - from adaptations (e.g., robotic devices for motor rehabilitation) to some new concept of user interfaces - and so on, considering also the combination of each of these and other subjects.
Another benefit from this approach, as mentioned earlier, is the avoidance to write low-level softwares for virtual interfacing purposes. Such an effort can get very complicated and sometimes infeasible for simpler projects. SethBling did an outstanding work in MarI/O applying evolutionary mechanisms to obtain a topology of an artificial neural network that controls Mario properly, being able to cross an entire level. However, it was necessary to deal with an interface in order to exchange IO with an emulator. As far as feasibility is concerned, getting familiar with a particular programming language, as well as studying the achitecture of an emulator are not trivial tasks to be performed and sometimes become more difficult than the project itself. On the other hand it could be a nice excuse to learn more, if you have time :)
It is important to point out that this approach (using this game environment) is useful for recreating 2D games only. In case of a 3D game, Unity 3D does the job very well - it also works with 2D, but I particularly prefer running away from the way they do.
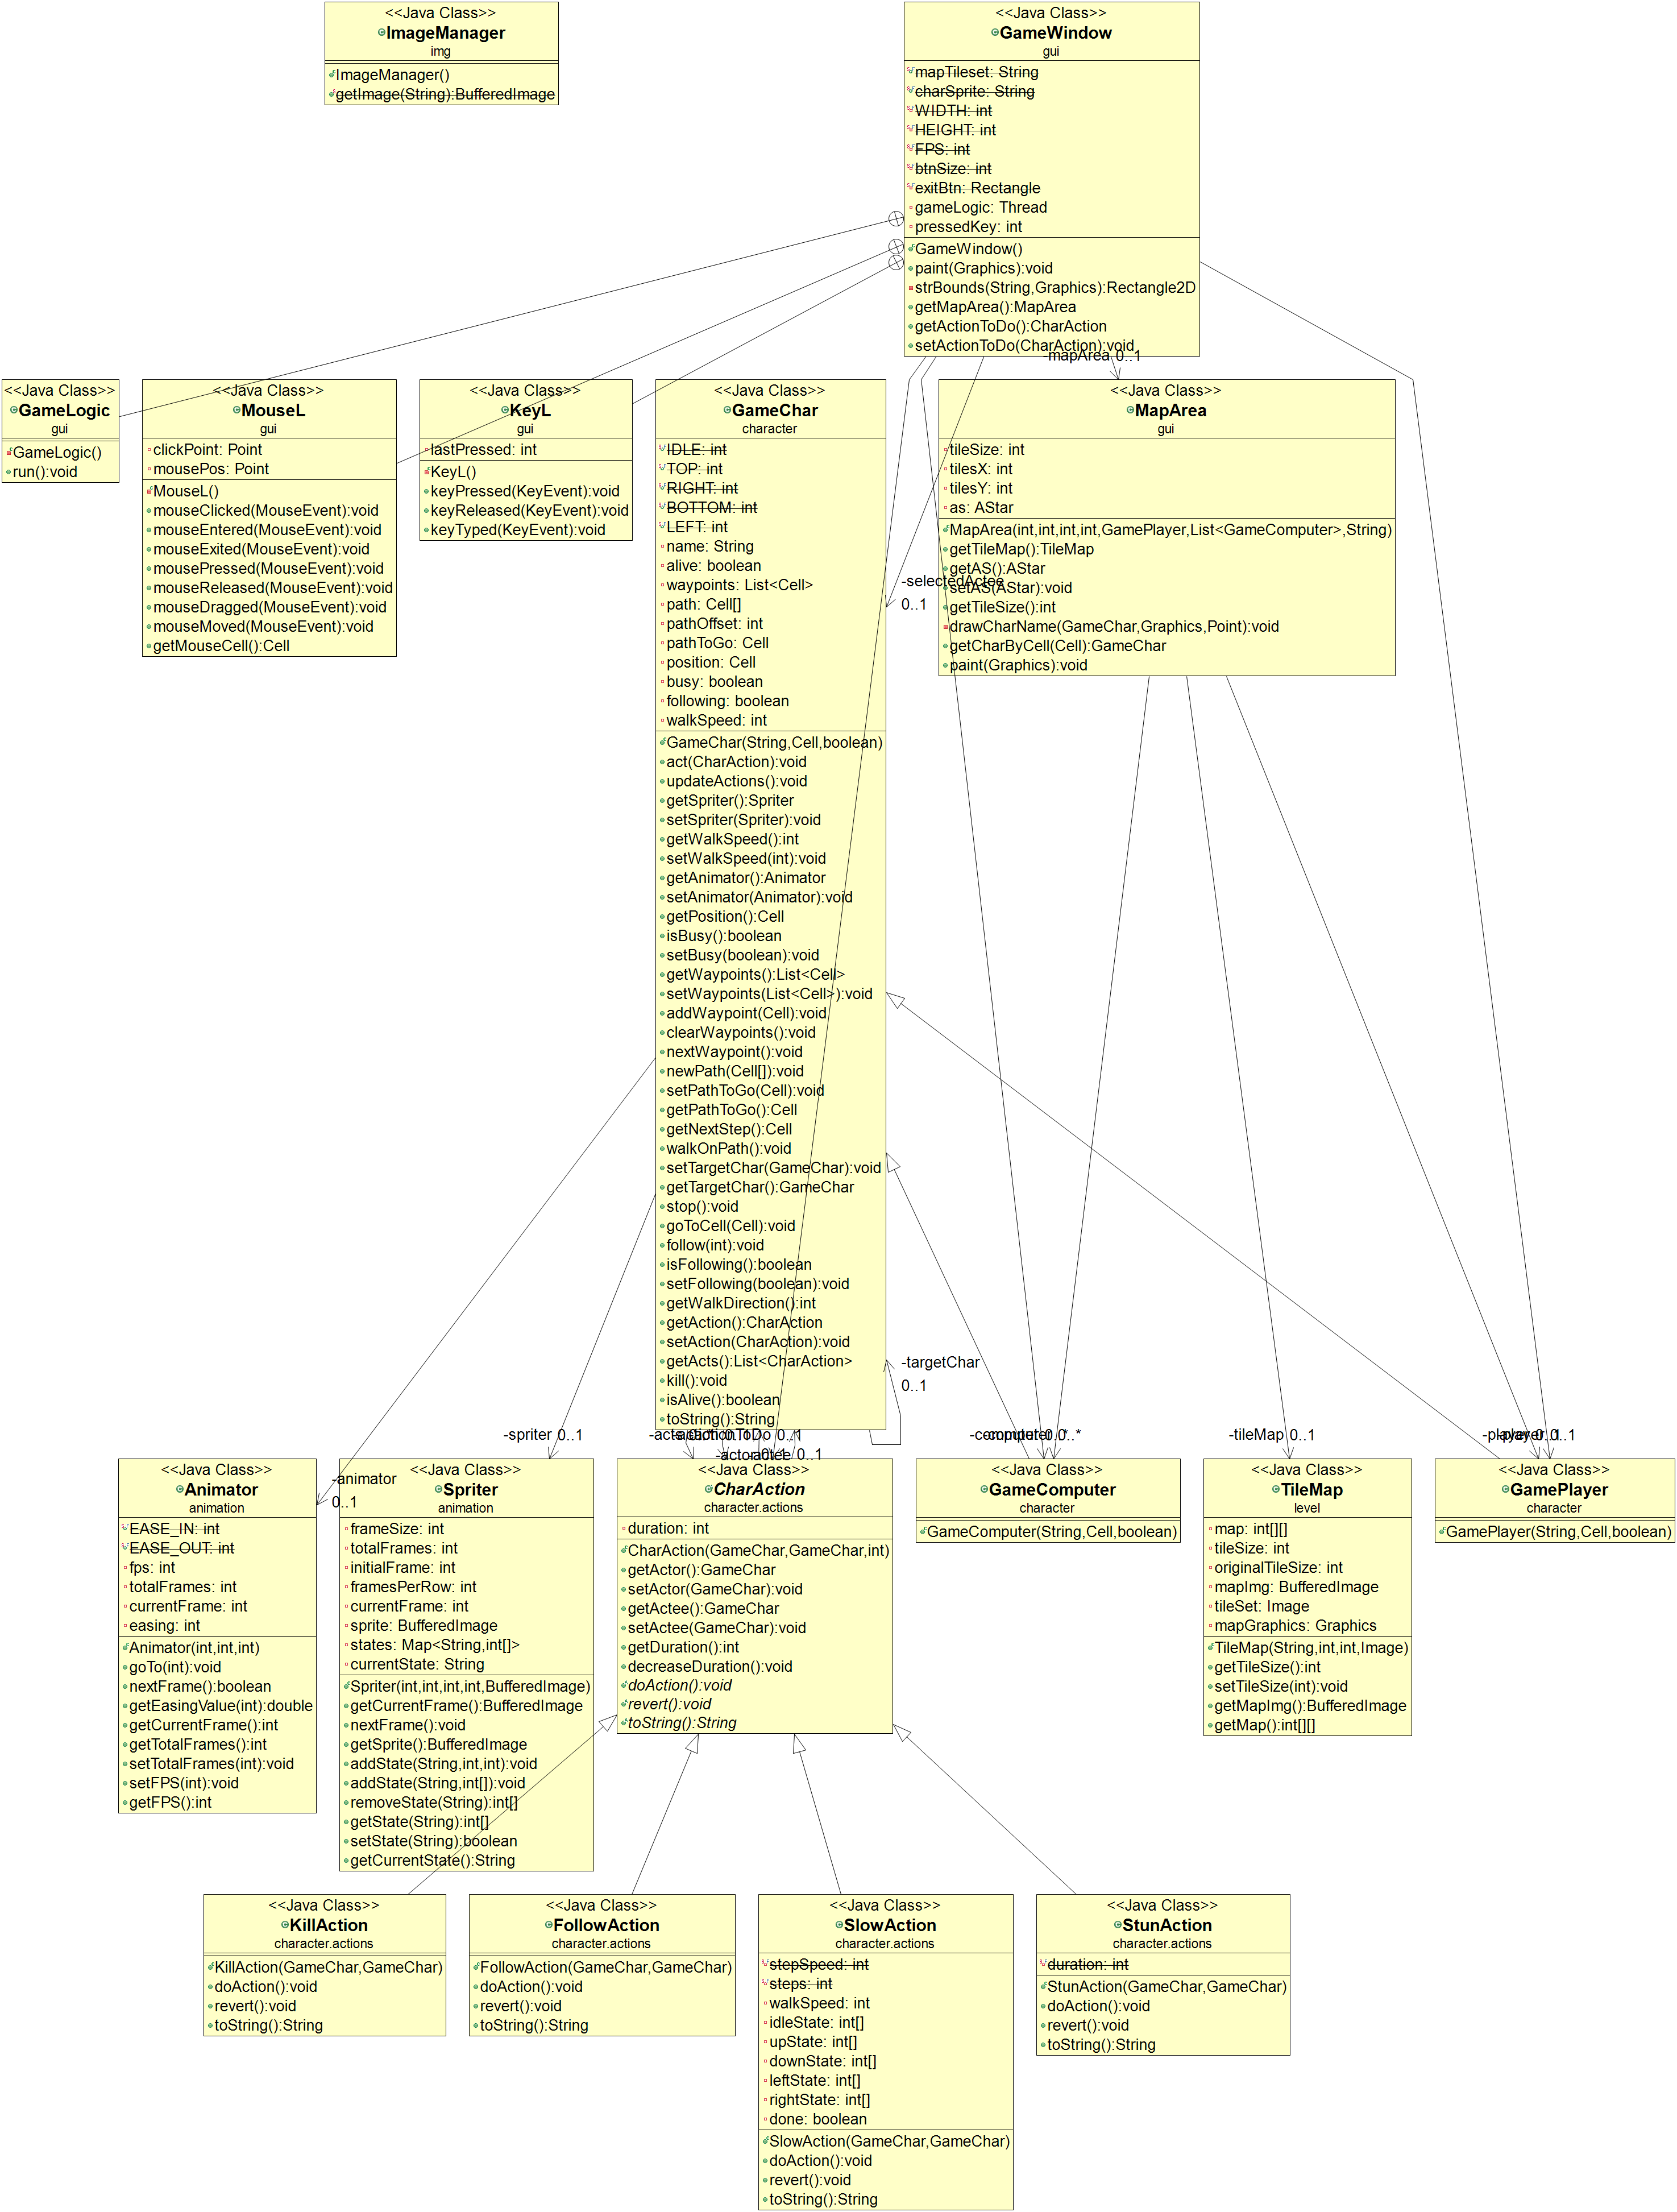
This article encompasses some implementation details. The full UML class diagram can be seen here, but there are some information necessary to assimilate first in order to easily understand the diagram and the code itself. Such information are elucidated as an intuitive notion in the following sections.
GUI
The GUI was developed using Java’s Swing. The figure below gives a good understanding of the structure of graphic components.
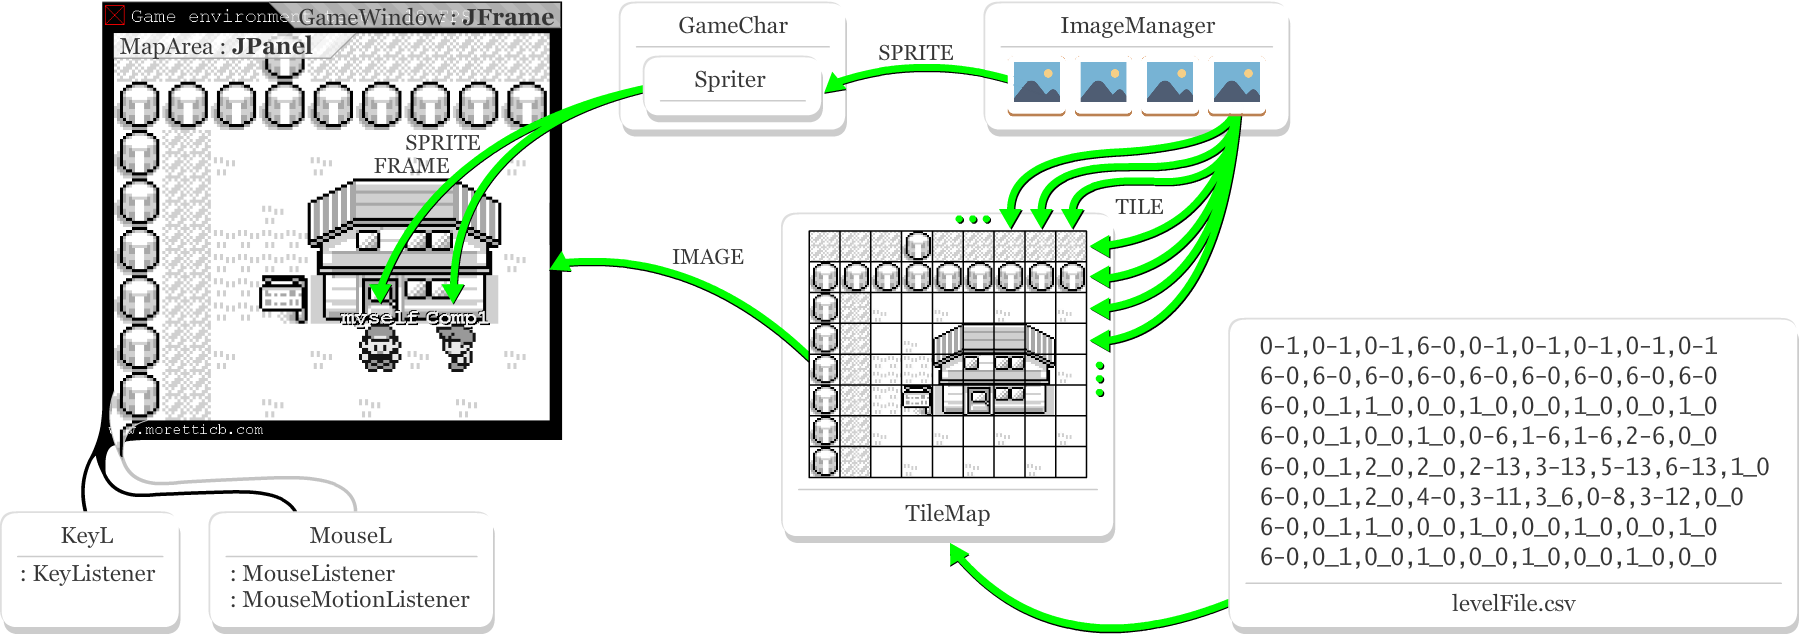
It actually has only two GUI components (a JFrame and a JPanel). Everything else is about drawing graphic primitives, images and calculating positions on canvas. Swing toolkit also provides a good support to listeners, which were also used.
Most of the graphical activity occurs in the double-buffered JPanel, which receives a tiled image and sprite frames of characters. Each iteration of the game loop calulates the position of each animated elements and updates the buffer to be displayed.
The mouse listener is used to click on a point of the map either to go to, or to perform an action in a character (in case the clicked place contains a character). The key listener is used to walk on the map (arrow keys) and to choose actions to perform: follow (F), stun (T), slow (S) and kill (K) - run the code and try it yourself. More about actions is covered ahead.
Level
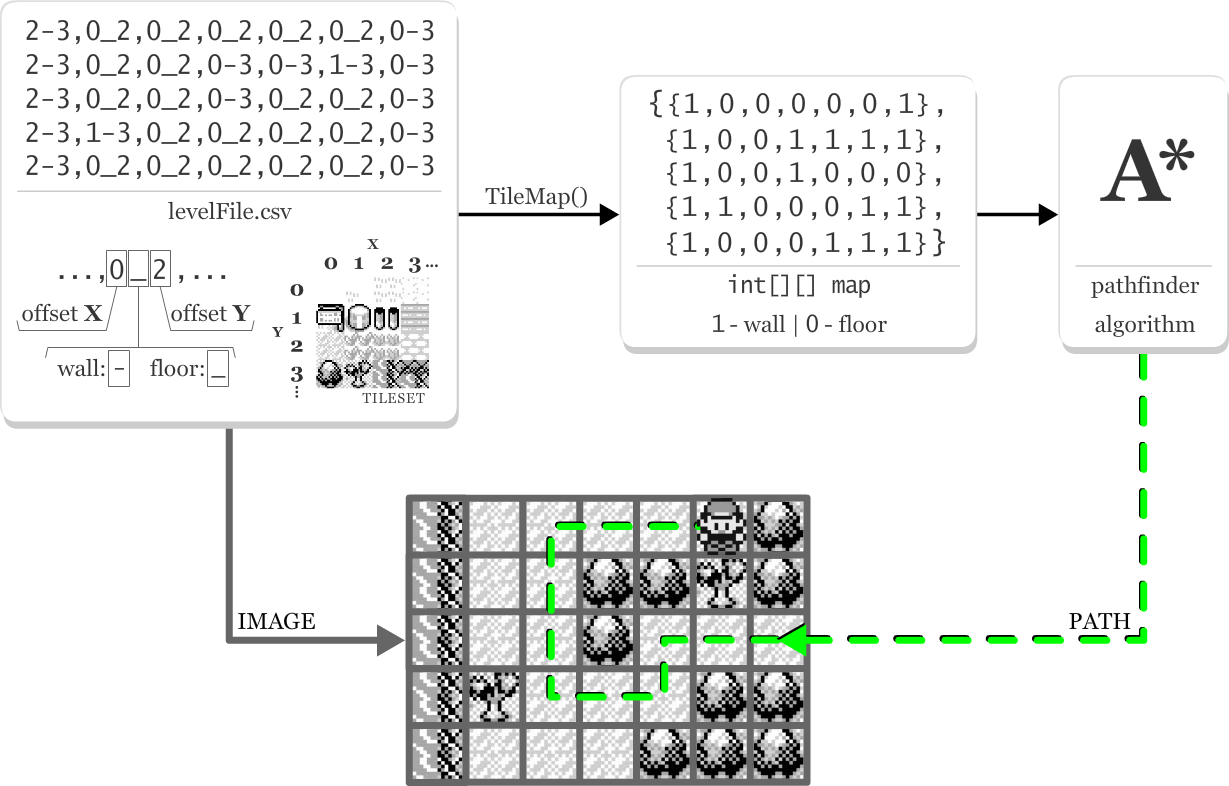
Given a tileset image and a CSV file with comma-separated tileset coordinates, an image of the map can be built. As illustrates the figure below, each coordinate consists of two values and a special character (between coordinate values) to indicate whether the player can walk on that tile (floor) or not (wall).
Tile map
From the CSV file where a level is designed, TileMap class builds the tilemap image. For each coordinate, the due referenced area of the tileset is copied and drawn on the tilemap image. The arrangement of tiles is obviously the same as the organization of coordinates in the level file.
Pathfinder algorithm
The TileMap class also performs a conversion from the level file structure to a 0-1 matrix. Such matrix composes the input (along with origin and destination locations) of the A* pathfinder algorithm used to obtain shortest paths set as routes of characters. Each location of this matrix and the tilemap is called a cell.
Animation
Every element shown in MapArea that smoothly moves or changes its visual aspect undergoes an animation effect. Motion transition between current and next positions in the map, as well as changes in states of sprite sequences are covered below.
From game mechanics perspective, a walking character, for instance, consists of indicating current and next positions until the path to walk is completely traversed. Positioning characters, graphically, is about a rough change from one cell to another in the map. That is when animation takes place to make these rough transitions more smooth, at a frame update rate (FPS).
Spriter
Still regarding walking character example, it is necessary to show creatures’ movements coupled with motion along the map. These movements are represented in frame-by-frame animations in a spritesheet, or simply sprite, where each frame is an image of a character in a particular pose, composing the whole movement animation, which I am going to call a State.
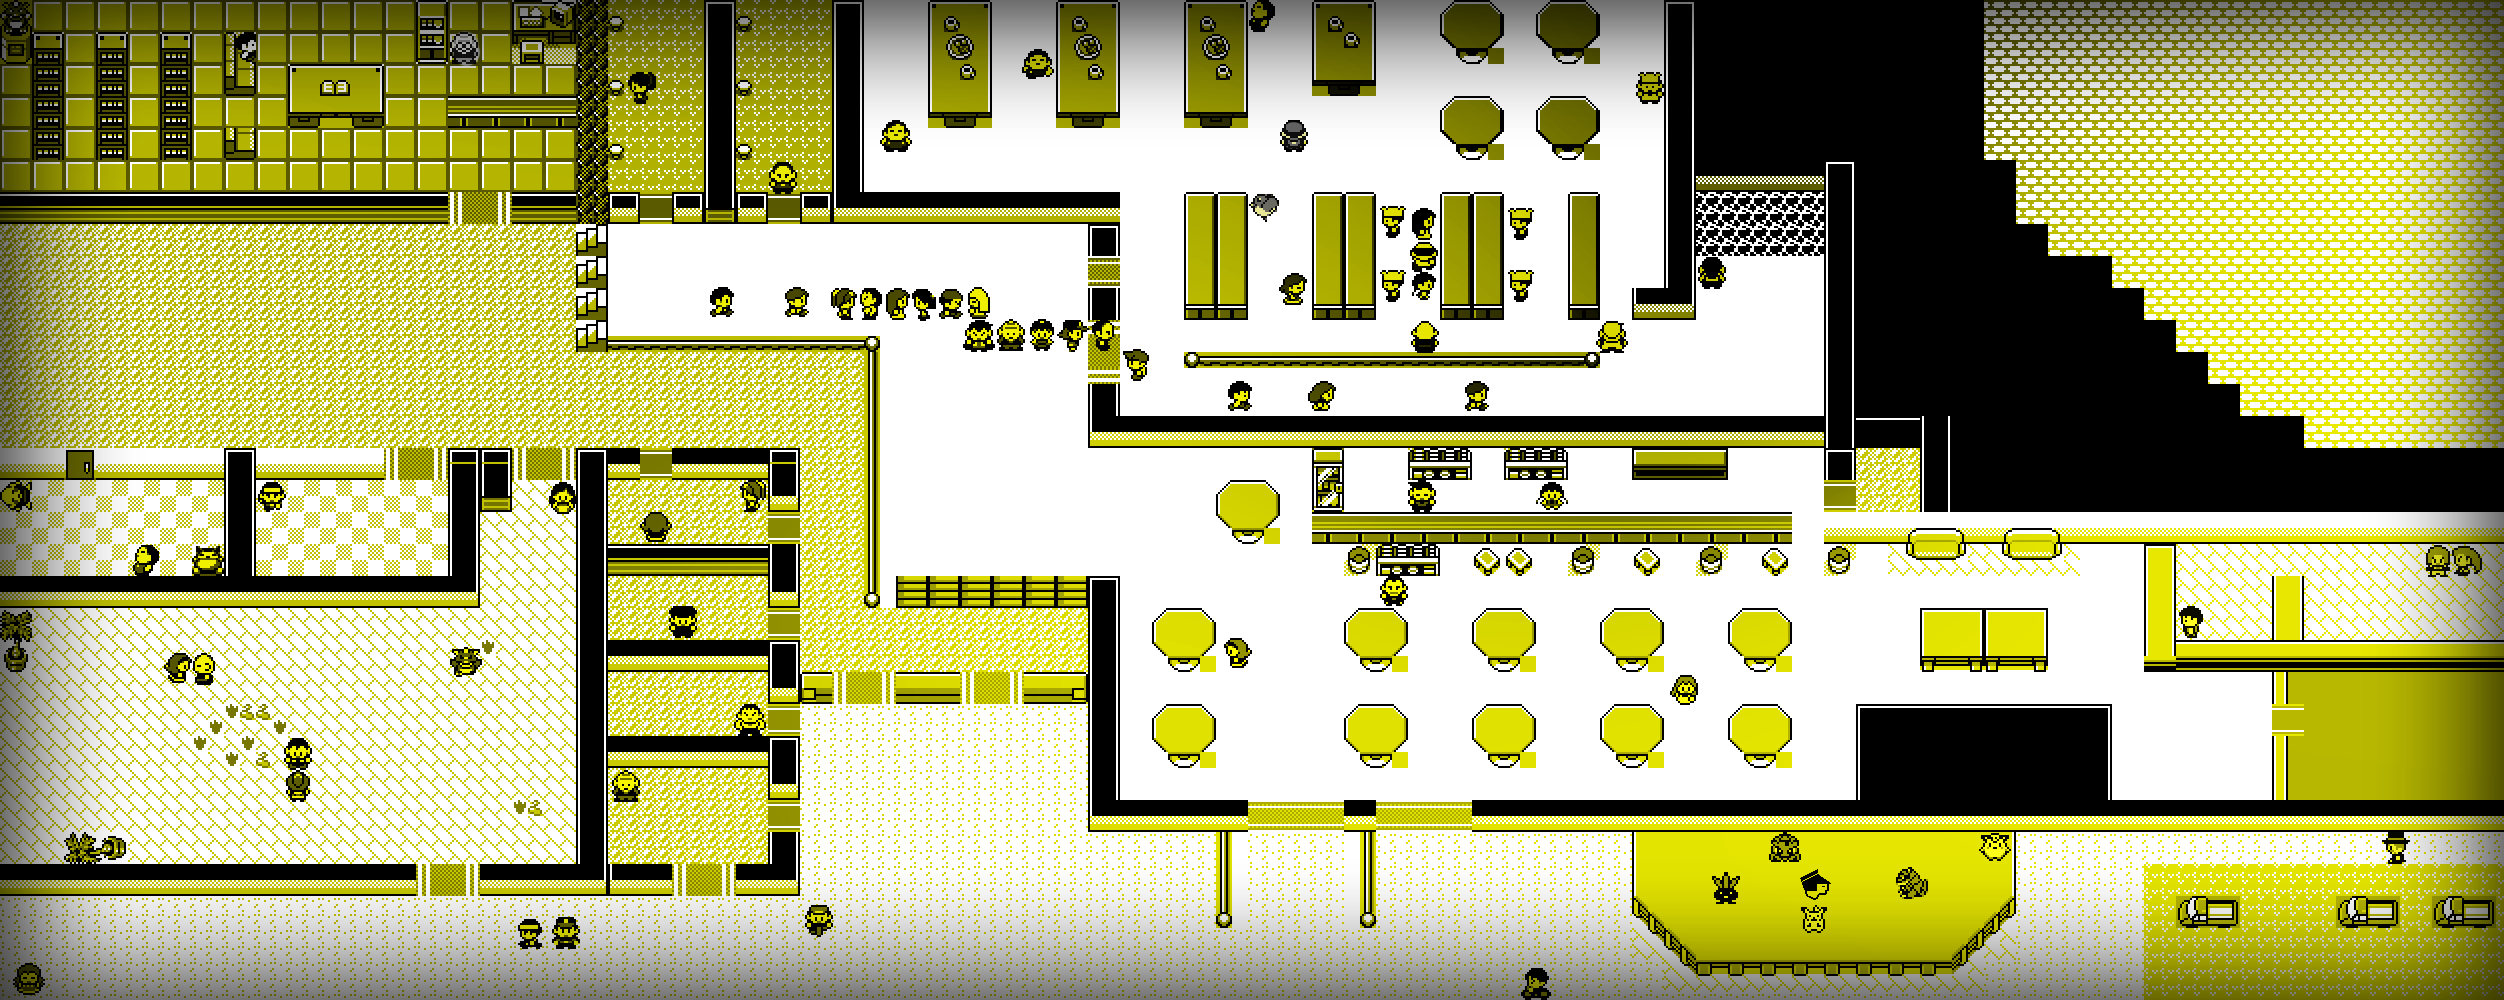
As can be seen above - Let me give the due credits to those who did a good job gathering GBC Pokemon tiles of the character sprites and the map tileset - Ash walking down, Gary walking down, Ash turning around and Ash walking right are examples of states in a spritesheet, which are respectively indicated by A, B, C and D. Note the arrangement of frames in the sheet, as well as the possibilities to combine frames and come up with animations (the states).
Animator
Transitioning from current to next position, Animator class produces a value within \( [0,1] \) in order to weight the length of a line segment \( l \) that connects origin to destination points in canvas. It basically interpolates values over time (frames, in this case) so values ranging in \( l \) creates motion.
Motion animation, in this project, is used only for walking characters; with the purpose of keeping a constant motion between the ending of one animation (when a cell is reached) and the beginning of the next one (when walking towards another cell) only a linear behavior was considered for interpolating values:
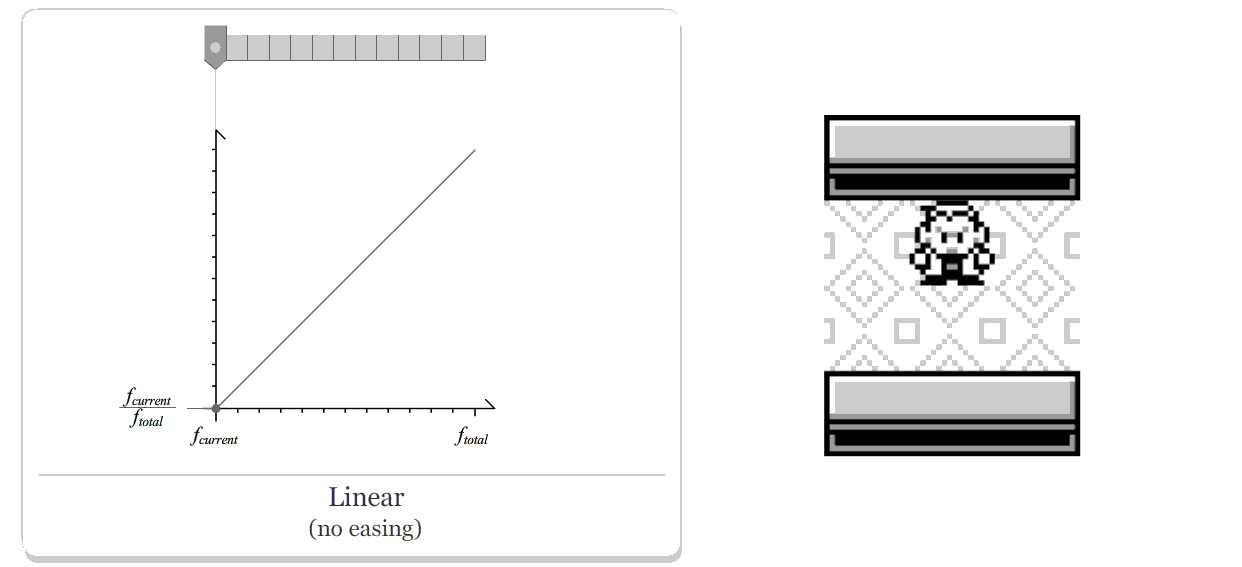
As shown above, given total duration of the animation (i.e., number of total frames \( f_{total} \)), linear interpolation is about having \( f_{total} \) equal segments (\( \dfrac{1}{f_{total}} \)) and as frames run over time, these segments increase uniformly being multiplied by current frame \( f_{current} \) (elapsed time).
I took this oportunity also to implement - because it’s fun - some simplified easing in interpolation behavior, giving a velocity boost either at the beginning or at the end:
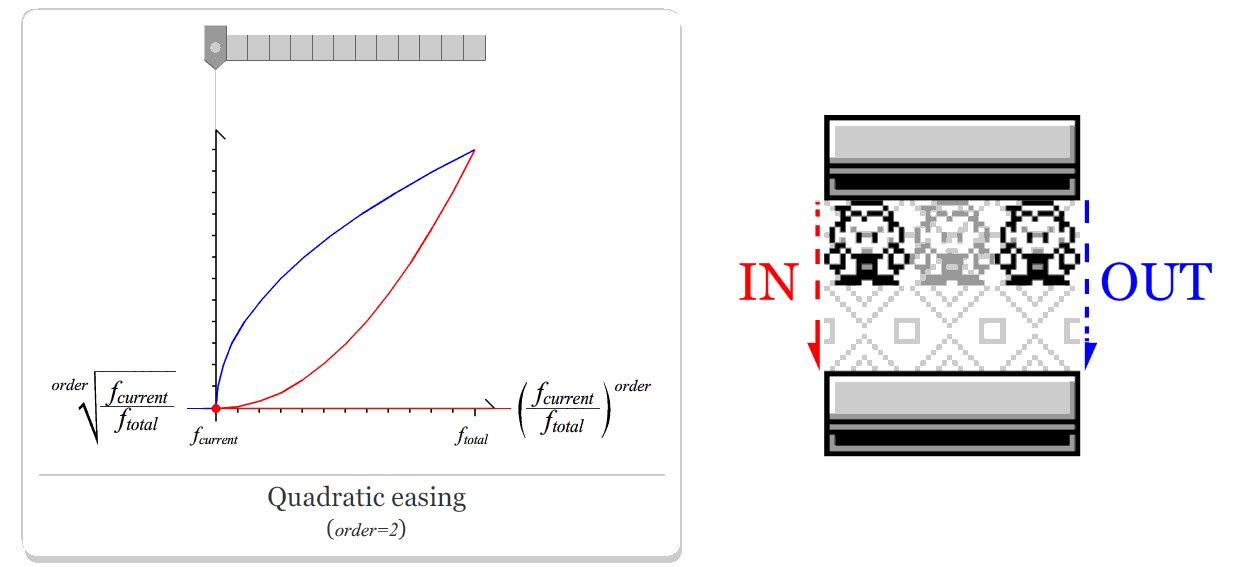
Easing in is about giving a boost at the end of interpolation (obviously because it begins with ease), whose behavior is given by linear behavior raised to some power to define the \( order \) of the polynomial and hence the boost intensity. As an example, above we consider \( order=2 \), so we have a quadratic function, or simply a quadratic ease in. Easing out plays the opposite role, whose behavior is the inverse function of the easing in polynomial.
For more about easing, check out Robert Penner’s website. There - different from here, where we deal with the highest-degree term of the polynomial only - can be found a deeper background on easing functions, as well as manipulation of polynomial coefficients and combination of easing in and out.
Characters
Every character (player and non-player) we see on the map is essentialy a GameChar. Looking at the class diagram we can see that no specific behavior (functionality) exists in their actual implementations GamePlayer (human players) and GameComputer (non-human players, a.k.a. NPCs). GameChar assumes an abstract role here, even though technically it is not. I left it like that on purpose for further implementations, because such an arrangement of entities would easily allow to separate different ways to perform the same behavior - polymorphism rocks - and then GameChar would truly become an abstract class.
Actions
Interaction between game characters can be seen as actions being executed to each other. Every action involves two people: the one who executes and the undergone one, people I am respectively calling actor and actee - of course actee is a made-up word, it was inspired in a funny line of Chandler’s in a Friends episode where he said “… the messers become the messees!” - who are instances of GameChar.
Having an actor and an actee, an action behavior can be expressed through GameChar (or even through GamePlayer or GameComputer) methods. I could drain health points (HP) from a character, for example, by simply implementing a total of HP in characters; then public methods could remove some HP from actee and increment it in actor’s, and so on. Currently, as stated in GUI section, the implemented actions are to follow, to stun, to slow and to kill.
Given two characters on a map and melee actions, actor follows actee until they are close enough, and then the action itself is executed. Closeness here is defined by euclidean and manhattan distances (\( d_{euclidean}(\cdot , \cdot ) \) and \( d_{manhattan}(\cdot , \cdot ) \)) - see their usage at Game loop section.
Another interesting detail is that I just mentioned the actor follows the actee before executing an action, and then the action is executed; I also mentioned the existence of a Follow action. If you check the code, you will notice there is nothing to do at FollowAction class, because following is, say, a primitive function in the game, so when actor reaches actee, if action is an instance of FollowAction, actor must not stop following actee - I just translated code to text, check it yourself :).
ActionChar also has a duration (again, in frames), so temporary effects can also exist. When this duration finishes, a method to revert the effect to initial conditions is triggered.
Game loop
If you read until here - I tried to be brief, sorry! - I believe understanding the game loop will not be a problem. Below we have some definitions and the game loop algorithm.
- \( players \) is a collection of GameChar instances (GamePlayer or GameComputer)
- \( p_{target} \) is a GameChar \( p \) has to follow
- \( p_{waypoint} \) a destination cell (the location on the map) to go to
- \( p_{position} \) is the current location of \( p \)
- \( p_{anim} \) is the Animator instance for animating motion of \( p \)
- \( p_{path} \) is a collection of cells, which creates a path from \( p_{position} \) to \( p_{waypoint} \)
- \( p_{busy} \) indicates whether \( p \) is busy traversing a path
- \( p_{spriter} \) is the Spriter instance for frame-by-frame animations of \( p \)
- \( p_{direction} \) is the current direction \( p \) is walking towards
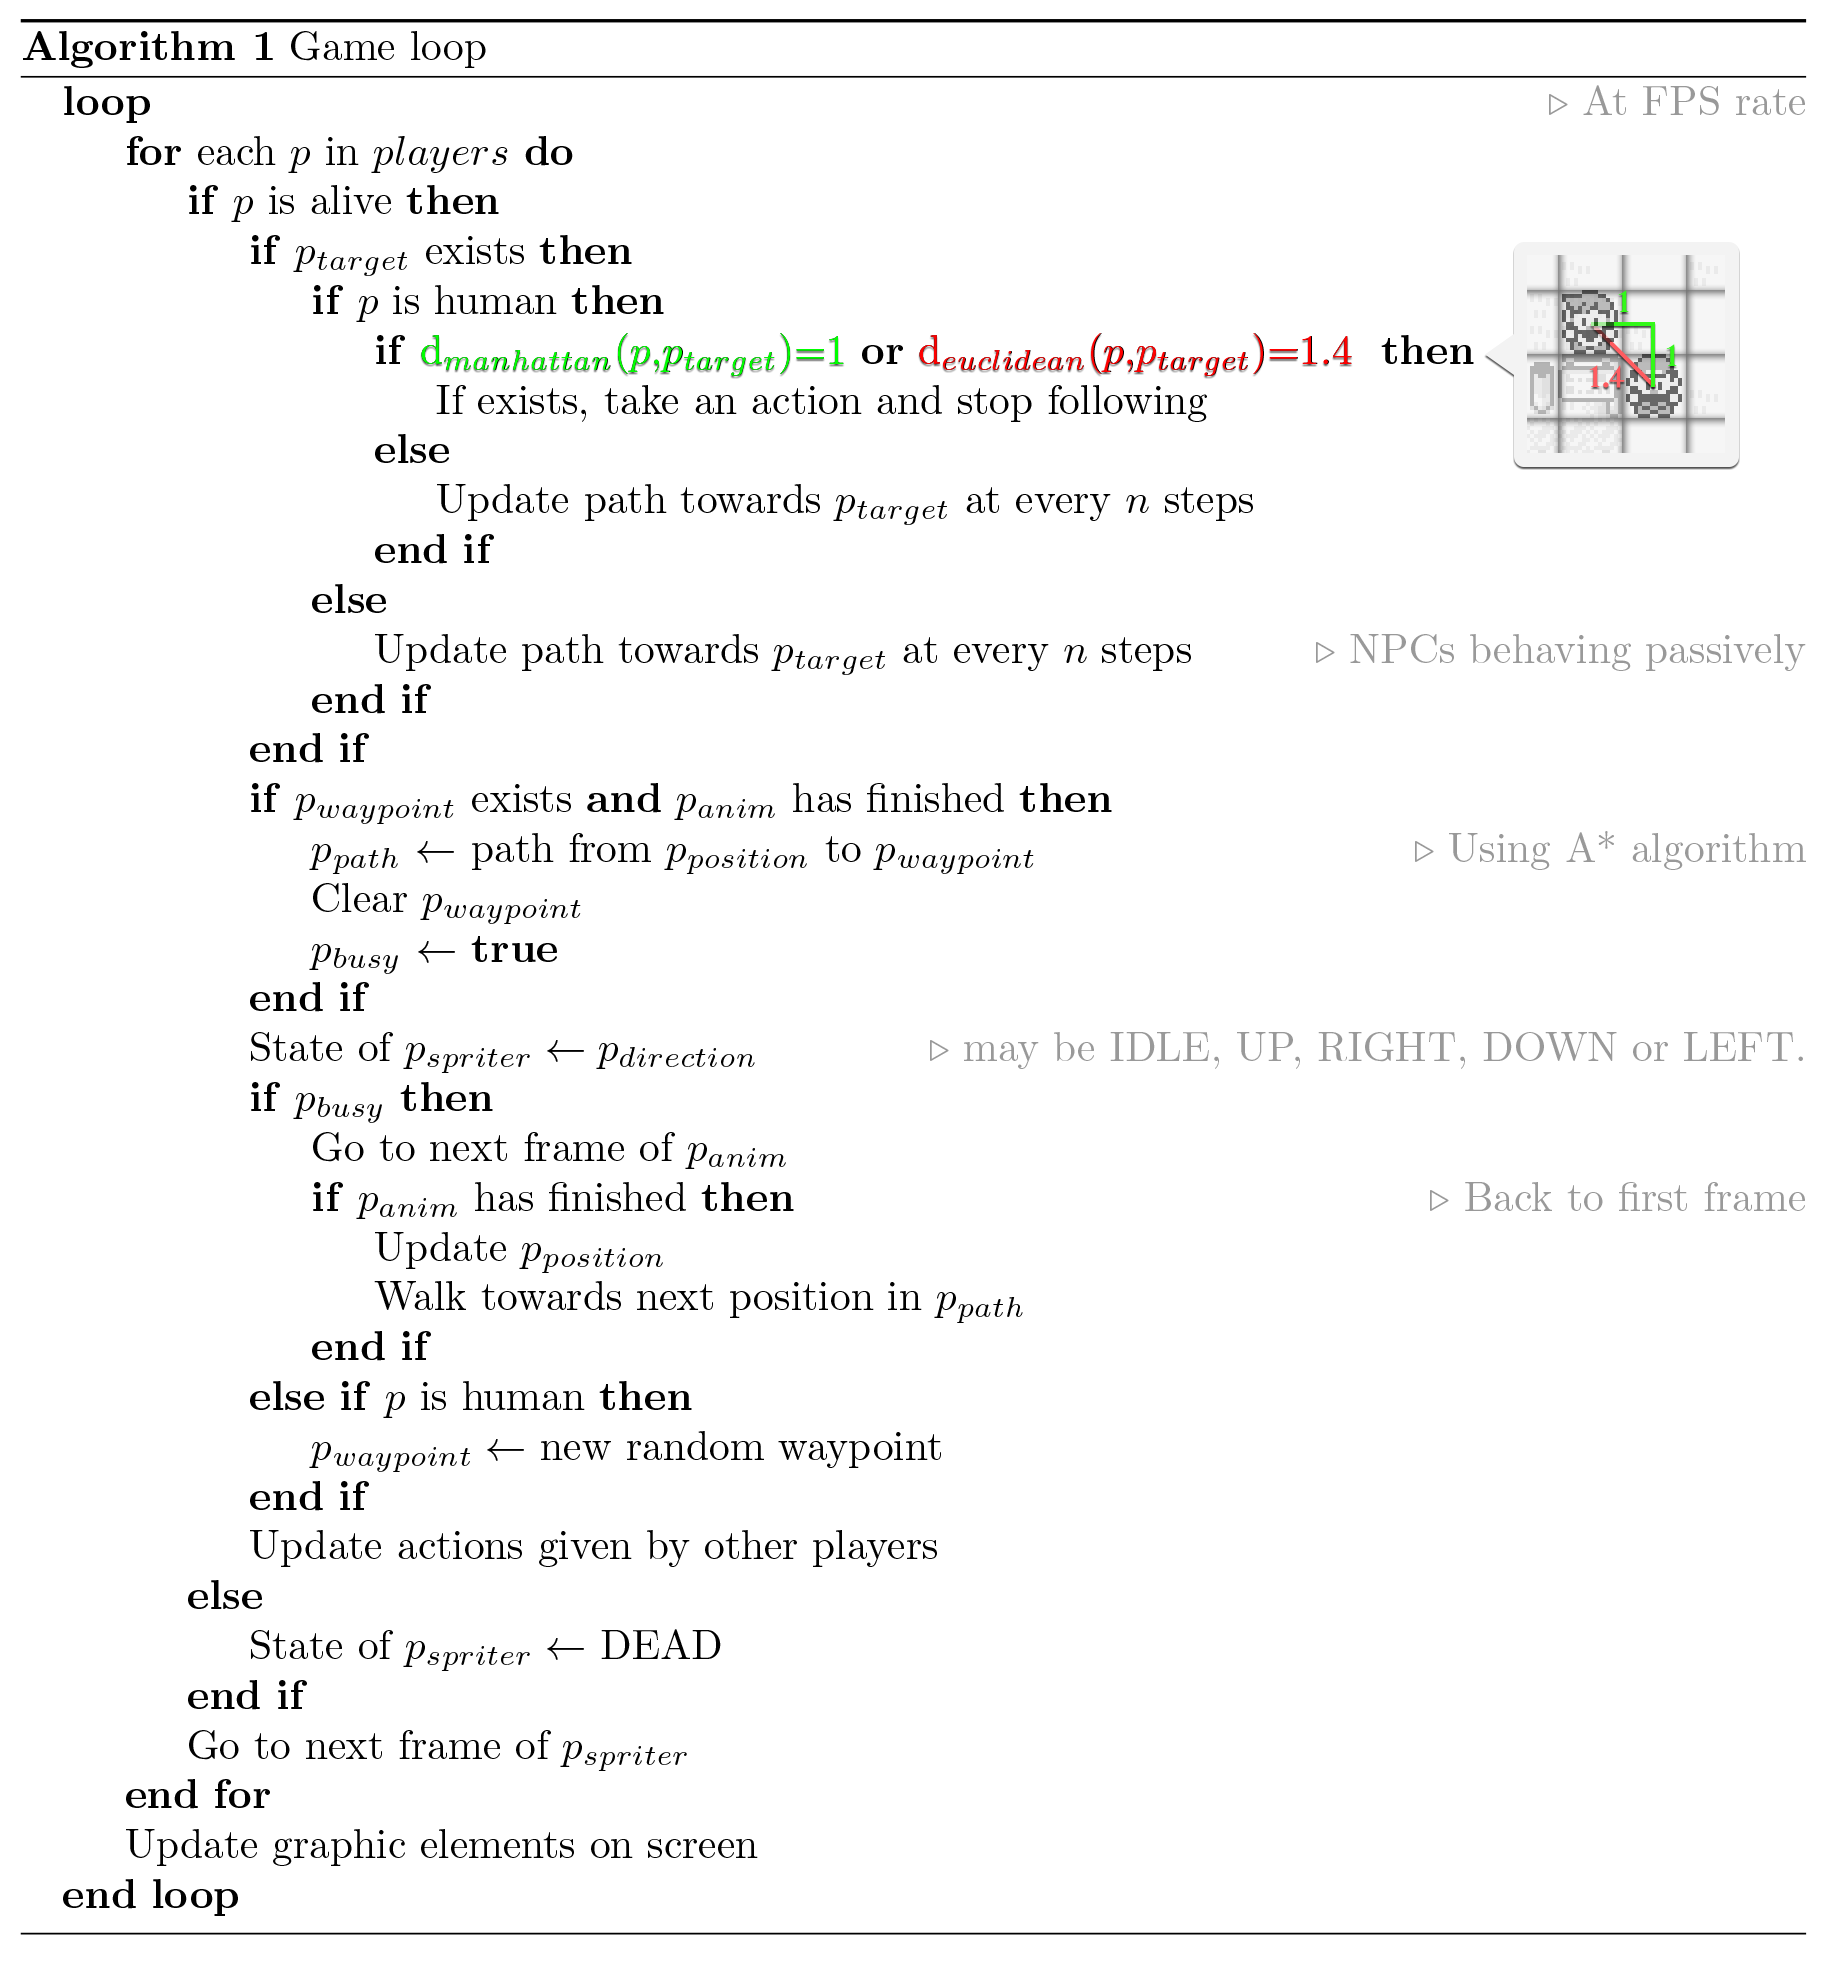
It is a simplified version of the logic running in a separated Thread to update the screen, state of characters and everything else in the game. Click here to open the original image (if everything is too short to read).
comments powered by Disqus